Imagine yourself relaxing on a lazy Sunday, only to suddenly notice an odd pool of water slowly forming near your baseboards. Or maybe you’ve watched your water bill inexplicably rise month after month? There’s a fair chance you might be dealing with a plumbing leak! Understanding the early signs of these elusive foes can not only save your home from extended damage but also curb inflated costs on water bills. Stay tuned as we give you the lowdown and uncover all the secrets involved in detecting those sneaky leaks that could be lurking anywhere in your home’s complex labyrinth of pipes. Follow this comprehensive, step-by-step guide that will turn you into a seasoned detective, with or without a wrench!
How to Find Leaks in Your Plumbing
To determine if there are leaks in your plumbing, you can perform a simple leak detection test. Start by checking your water meter and ensure all water sources are turned off. Observe the meter dial for any movement, as this indicates water pushing through the meter and suggests a leak. Additionally, inspect for wet spots on the ground or walls, which could indicate a leak in the pipe between the water meter and your home or in the sprinkler system. Another method is dropping a dye tablet in the toilet tank to check for leaks. If colored water appears in the bowl without flushing, there is a leak. Lastly, listen for the sound of running water coming from your toilet, as it may also indicate a leak. If you suspect a leak or need assistance with leak detection, it is recommended to contact a licensed plumber for professional assessment and repairs.
Identifying Signs of Plumbing Leaks
Before we dive into the methods of how to find leaks in your plumbing, it’s crucial to understand the signs indicating their presence. By being vigilant and observant, you can catch leaks early on and prevent further damage. Here are some common indicators that you may have a plumbing leak:
Unexplained Increase in Water Bills: If your water bills have been consistently rising without any change in water usage patterns, there’s a chance that an undetected leak is causing the spike.
- Strange Sounds: Keep an ear out for unusual sounds like dripping or running water when all faucets and appliances are turned off. These can be indications of a hidden leak within walls or pipes.
- Musty Odors: The presence of mold or mildew can lead to musty odors. If you constantly notice these smells, even after cleaning, it could be a sign that there’s a hidden leak causing moisture buildup.
- Water Stains and Discoloration: Pay close attention to your ceilings, walls, and floors for any signs of discoloration or water stains. These unsightly marks may indicate a persistent leak in the plumbing system.
- Mold and Mildew Growth: Moisture resulting from leaks creates an ideal environment for mold and mildew growth. Keep an eye out for fuzzy patches on walls, ceilings, or other surfaces prone to humidity.
- Warping or Bulging: Look for any visible warping or bulging on walls, baseboards, or flooring as this could be an indication of water damage caused by an ongoing plumbing leak.
- Now that we’ve familiarized ourselves with the general signs of plumbing leaks, let’s start our journey towards identifying these leaks by focusing on visual and olfactory signs.
Spotting Visual and Olfactory Signs
When it comes to spotting plumbing leaks, our eyes and noses can be excellent allies. Here are some visual and olfactory signs that may indicate the presence of a leak:
- Water Accumulation and Puddles: Keep an eye out for unexpected water accumulation or puddles in areas like the bathroom, kitchen, basement, or near water fixtures. These are clear signs of leaking pipes or appliances.
- Dripping Faucets: A continuously dripping faucet may seem harmless, but it can waste a significant amount of water over time and also suggest underlying plumbing problems.
- Water Meter Movement: To determine if there’s a leak in your plumbing system, you can conduct a simple test using your water meter. Turn off all sources of water in your home and observe the meter. If it continues to move, even when no water is being used, it indicates an ongoing leak.
- Wet Spots on Walls or Ceilings: Keep an eye out for any wet spots, discoloration, or softening of walls or ceilings. These areas could indicate a hidden pipe leak within the structure.
- Musty Odors: As mentioned earlier, musty odors are often associated with mold or mildew caused by moisture from leaks. Trust your nose and investigate any unusual smells that persist even after cleaning.
- Visible Mold Growth: If you notice visible patches of mold or mildew in areas with high humidity, such as bathrooms or basements, it’s a strong indication that there is excess moisture due to a leak.
- Remember, spotting visual and olfactory signs of plumbing leaks should be followed by proper assessment and repair conducted by a licensed plumber. They have the necessary expertise and tools to locate and address the source of the leaks effectively.
Now that we’ve explored visual and olfactory signs of plumbing leaks; let’s move on to conducting household tests for spotting leaks to ensure thorough detection.
- The Environmental Protection Agency estimates that a typical single-family home leaks around 10,000 gallons of water every year.
- According to the American Water Works Association, approximately 15% of water entering distribution systems is lost due to leaks.
- The Find and Fix Leaks survey showed that 64% of homeowners have experienced a pipe leak in their home at some stage.
Household Tests for Spotting Leaks
Detecting leaks in your plumbing system is crucial to prevent water damage, conserve resources, and save money. Fortunately, there are several effective tests you can perform within your household to spot potential leaks. These tests involve simple observations and can provide valuable insights into the presence of leaks.
One common method is the toilet dye test. Simply drop a dye tablet or a few drops of food coloring into the toilet tank and wait for about 20 minutes without flushing. If colored water seeps into the bowl, it indicates a leak in the toilet flapper valve that requires attention. This test is useful as toilets are a common source of hidden leaks that can go unnoticed for extended periods.
Another straightforward test involves visual inspection. Look for wet spots on walls, ceilings, or floors, which could indicate leaking pipes behind them. Additionally, keep an eye out for discoloration or warping of walls or flooring materials. These signs can be indicative of long-standing concealed leaks and warrant further investigation.
Sarah noticed a sudden spike in her water bill and decided to investigate potential leaks in her home to mitigate further expenses. During her visual inspection, she discovered damp spots on her bedroom wall, coupled with a musty smell. Concerned about possible water damage, Sarah immediately called a licensed plumber to assess the situation and address any hidden leaks.
Listening for the sound of running water can also prove useful. Take some quiet moments in different parts of your house and listen attentively for any running water sounds. Even the faintest sound could indicate a leak somewhere within your plumbing system that needs investigating.
Now that we’ve covered some household tests to spot leaks, let’s explore specific tests involving pressure, shutoff valves, and meter readings to detect and confirm potential leaks in your plumbing system.
Pressure, Shutoff, and Meter Tests
To further investigate if there are leaks in your plumbing system, you can perform tests involving pressure, shutoff valves, and meter readings. These tests help pinpoint the source of leaks and provide valuable information for repair or maintenance.
One common method is the pressure test. Start by turning off all faucets, ensuring no water appliances or fixtures are being used. Take note of the current reading on your water meter. Wait for a few hours without using any water and then check the meter again. If the meter reading has changed, it suggests a leak within the plumbing system. This test helps determine if there are hidden leaks that may not be easily identifiable through visual inspection alone.
Think of the pressure test as a detective gathering evidence to solve a mystery. By comparing the initial and final meter readings, you gather crucial evidence to identify potential leaks within your plumbing system.
In addition to the pressure test, you can also perform shutoff valve tests. One way is to turn off the water supply to individual fixtures or appliances, such as toilets or sinks. Check for any drops in the water meter dial movement after shutting off each valve. If there’s still movement observed, it indicates a leak between that fixture or appliance and the main water line.
Remember that these tests may require some time and careful observation but can prove vital in detecting and identifying even hidden leaks around your house. It’s important to keep track of any observed changes or results during these tests for accurate diagnosis and necessary repairs.
Common Culprits of Household Leaks and How to Find Leaks in Your Plumbing
Household leaks can be a major headache for homeowners, causing water damage, skyrocketing water bills, and even potential health hazards. It’s essential to identify the common culprits behind these leaks to promptly address them. Let’s explore some of the primary sources of household leaks:
1. Faucets: Dripping faucets are one of the most common sources of household leaks. This can often be caused by worn-out washers or faulty cartridges within the faucet mechanism. Even a small drip can waste a significant amount of water over time, leading to both financial and environmental concerns.
Imagine coming home after a long day at work, only to hear that annoying drip from your faucet. Not only does this disturb your peace, but it also adds up on your water bill. Identifying and fixing such leaks promptly can save you both money and sanity.
2. Toilets: Another culprit behind household leaks is often found in the bathroom – toilets. A leaking toilet can go unnoticed for an extended period since it may not create visible water puddles on the floor. However, it can lead to silent water wastage and increased water bills.
Picture this: You flush the toilet and walk away, thinking everything is fine. Little do you know, there’s a leak in the tank or flapper that allows water to continuously flow into the bowl. Over time, this silent leak can waste hundreds of gallons of water without your knowledge.
3. Piping: Pipes located within the walls or beneath the floors are also prone to leakage and can cause considerable damage if left unattended. Factors such as age, wear and tear, poor installation, or temperature fluctuations can contribute to pipe leaks.
John recently noticed damp spots on his living room wall, along with a musty odor. Concerned about what could be causing this, he called a licensed plumber to investigate. After careful inspection, the plumber found a leak in the piping within the wall, leading to both moisture damage and mold growth.
Now that we have identified some common culprits behind household leaks let’s delve into specific areas where leaks may occur – toilets, faucets, and piping.
Toilets, Faucets and Piping
Let’s start with toilets. Leaks within toilets can occur in various components such as the flapper valve, refill tube, or ballcock assembly. A leaking flapper valve is a common issue and can easily be detected by adding a few drops of food coloring into the toilet tank. If colored water appears in the bowl without flushing, it indicates a leaking flapper.
When it comes to faucets, identifying leaks usually involves checking for drips or excessive moisture around the faucet spout or handles. A faulty cartridge, worn-out O-rings, or a damaged washer are often responsible for these leaks. Promptly replacing these components can help eliminate the leakage problem.
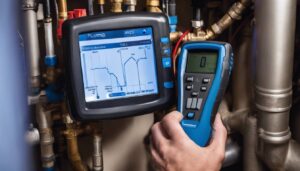
Lastly, let’s focus on piping. Leaks within pipes require closer inspection. Signs such as wet spots on walls or flooring, discolored or warped surfaces, dripping sounds, increased water bills, or even musty odors could indicate a pipe leak. If you suspect a pipe leak but cannot find the source visually, it’s advisable to call a licensed plumber who can utilize specialized tools like moisture meters and infrared cameras to locate the issue accurately.
Samantha knew there was a leak somewhere in her home; however, she couldn’t pinpoint its exact location. She decided it was time to seek professional help. The plumber used an infrared camera and discovered that there was a hidden leak behind one of her bathroom walls. By fixing the leak promptly, Samantha was able to prevent further damage to her home.
Steps to Take After Discovering a Leak
Discovering a leak in your plumbing can be an unsettling experience, but it’s important to take immediate action to prevent further damage. Here are the steps you should take after discovering a leak:
- Turn off the water: As soon as you notice a leak, locate the main shutoff valve and turn off the water supply to your home. This will help minimize any additional water damage and give you time to assess the situation.
For instance, imagine coming home one day to find water seeping out from under your bathroom sink. The first thing you should do is locate the shut-off valve for that specific fixture and turn it off. It’s crucial to act quickly before the leak worsens.
- Assess the extent of the damage: Once the water supply is turned off, carefully examine the affected area and determine how extensive the damage is. Look for any signs of mold growth, discoloration on walls or ceilings, or pooling water.
- Contain the leak: If possible, try to contain the leak by placing buckets or towels beneath the affected area to collect dripping water. This can help prevent further damage to your property while you wait for professional assistance.
- Document evidence: Take photos or videos of the leak and any associated damage. These visual records will be valuable when filing an insurance claim or when discussing the issue with a plumber.
- Contact a licensed plumber: While some minor leaks can be fixed by homeowners, it’s always advisable to seek professional help, especially if you’re unsure about the source or severity of the leak. A licensed plumber will have the expertise and tools needed to diagnose and repair the problem effectively.
Now that we’ve covered what steps to take after discovering a leak let’s delve into differentiating between DIY fixes and situations where calling a plumber might be the best course of action.
DIY Fixes and When to Call a Plumber
Fixing plumbing issues yourself can be satisfying, but it’s essential to know your limits. Here are some common types of leaks and scenarios where you can attempt a DIY fix and when it’s better to call a plumber:
1. Minor faucet leaks: If you notice a slow drip from a faucet, it might be a simple fix that you can tackle on your own. Often, replacing worn-out washers or O-rings can solve the issue. However, if the leak persists even after these replacements, it’s best to consult a professional.
Imagine you have a leaky kitchen faucet that drips constantly. In this case, you may try tightening the faucet handle or consider replacing the cartridge or valve assembly as these components are prone to wear and tear. However, if the leak continues or worsens despite your efforts, it’s recommended to reach out to a plumber.
- Pipe leaks: If you discover a small leak in a pipe joint, such as under your sink or behind a wall, you may be able to fix it temporarily with plumber’s tape or pipe sealants available at hardware stores. However, it’s critical to understand that these fixes are temporary solutions and may not address the underlying cause of the leak.
- Major leaks or burst pipes: For significant leaks or burst pipes, it is crucial to contact a licensed plumber immediately. These situations require specialized knowledge and tools for proper repairs. Ignoring or attempting to fix major leaks on your own can lead to further damage and potential hazards.
While DIY fixes can be effective in certain cases, calling a plumber ensures that the problem is addressed correctly from the start. It also provides peace of mind knowing that professionals with expertise are handling the repairs.
- When it comes to plumbing issues, it’s important to know when you can tackle the problem yourself and when it’s best to call a professional plumber. Minor faucet leaks, such as slow drips, can often be solved with simple replacements of washers or O-rings. However, if the leak persists, it’s advisable to consult a plumber. Temporary fixes like plumber’s tape or pipe sealants can be used for small pipe leaks, but it’s important to understand that these are temporary solutions. Major leaks or burst pipes require immediate attention from a licensed plumber due to the complexity of repairs involved. Ignoring or attempting DIY fixes for major leaks can lead to more damage and potential hazards. While DIY fixes can work in certain cases, calling a plumber ensures that the problem is correctly addressed from the start by professionals with expertise in plumbing repairs.