How to Find a Water Leak in Your House: Step-by-Step Guide
Are you noticing suspiciously high water bills, mold on walls, or wet spots around your property? You might have a hidden water leak! Unresolved leaks not only lead to structural damage in your home but can also significantly inflate costs on your utility bill. The good news is – you can find and fix these silent culprits before any major headache springs up. Welcome to our comprehensive, do-it-yourself, step-by-step guide to finding water leaks in your house. Let’s dive into the world of pipes and faucets and help you save both money and your precious abode.
Finding a water leak in your house can be challenging, but there are several methods you can try. Look for visible signs of water stains on ceilings, walls, or floors as a first indicator. Conduct a water meter test by turning off all faucets and checking if the meter continues to run, indicating a possible leak. Additionally, listen for running water sounds and check appliances and toilets for any leaks. If you suspect a hidden leak behind walls or ceilings, it is recommended to contact a professional plumber who can utilize moisture meters infrared cameras or perform necessary inspections to accurately locate and repair the leak before further damage occurs.
Detecting Signs of a Water Leak in Your Home
Water leaks can go unnoticed for a long time, causing significant damage if not addressed promptly. It’s crucial to be vigilant and watch out for early signs of a water leak in your home. By detecting these signs early on, you can take immediate action and prevent further damage. Here are some key indicators to look out for:
Imagine walking into your kitchen one morning and noticing water stains on the ceiling. This might indicate a leak somewhere above the ceiling, which needs to be identified and fixed before it worsens.
- Water Stains: Check for any water stains on ceilings, walls, or floors. These stains often appear as discolored patches or even bubbling paint. They are usually the first visible sign of a water leak and should not be ignored.
- Water Meter Test: Conduct a water meter test by turning off all faucets in your home and checking the water meter. If it continues to run despite all faucets being shut off, there is likely a leak in your plumbing system that requires attention.
- Water Pressure Test: Turn off all faucets and measure the water pressure in your home. Low water pressure may indicate a possible leak in the plumbing system.
- Listening for Running Water: Sometimes, leaks can be heard through walls or floors as running water sounds. Take some time to listen carefully around your home for any unusual sounds that may suggest a hidden leak.
- Appliance Checks: Check appliances such as dishwashers, refrigerators, washing machines, and hot water heaters for any signs of leaks or dampness. Disconnect them from the outlet one at a time to identify the source if you suspect any issues.
- Toilet Leak Test: Use food coloring in the toilet tank overnight to check for leaks. If you see color in the bowl without flushing, it indicates a leaky toilet that needs to be repaired.
- Sudden Increase in Water Usage: Keep an eye on your utility bills and monitor for sudden spikes in water usage. A significant increase could be an indication of a hidden leak in your home.
- Visual Dampness: Look out for visual signs of dampness or moisture around the kitchen, bathroom, or laundry areas. Excessive moisture may suggest an underlying water leak.
By being aware of these signs and taking proactive measures to detect leaks early on, you can minimize the impact it has on your home and prevent further damage. Now, let’s explore some utility monitoring methods that can assist you in detecting water leaks.
- According to the Environmental Protection Agency (EPA), 10% of homes in the United States have leaks that waste 90 gallons of water or more per day.
- The Insurance Information Institute states that water damage claims have been growing faster than other components of homeowners insurance, and water damage is the second most frequently filed insurance claim in the United States
- According to data from WaterSense, household leaks can waste nearly 1 trillion gallons annually nationwide. That’s equivalent to the annual household water use of more than 11 million homes.
- Detecting water leaks early is crucial in preventing significant damage to your home. There are several key indicators to look out for, including water stains on ceilings, walls, or floors, conducting water meter and pressure tests, listening for running water sounds, checking appliances for leaks or dampness, using food coloring in the toilet tank for leak tests, monitoring utility bills for sudden spikes in water usage, and looking out for visual signs of dampness or moisture. By being vigilant and taking proactive measures to detect leaks early on, you can minimize the impact and prevent further damage to your home.
Utility Monitoring Methods
Utility monitoring methods are essential tools that can aid in identifying potential water leaks in your home. These methods help track water usage patterns and provide real-time data to identify any abnormal consumption that might indicate a leak. Here are two common utility monitoring methods:
- Water Meter Monitoring: Your water meter is a handy tool that can help detect leaks. Start by turning off all the water sources inside and outside your home. Take note of the reading on the water meter and leave it undisturbed for a few hours or overnight. Afterward, check the meter again. If there is an increase in the reading during the period when no water was used, it indicates a possible leak.
- Smart Water Leak Detectors: Smart water leak detectors are devices that connect to your home’s plumbing system and monitor water flow continuously. They can send alerts to your smartphone or other devices when unexpected changes or abnormal usage are detected, indicating a potential leak.
Imagine receiving an alert on your phone while you’re away from home, notifying you about a sudden increase in water flow at a specific location within your house. This allows you to take immediate action, perhaps by shutting off the main water supply or contacting a professional plumber to investigate.
By utilizing these utility monitoring methods, you can stay proactive in identifying and addressing water leaks before they cause significant damage. Keep in mind that these tools serve as aids, and regular visual inspections are still necessary to ensure comprehensive leak detection.
Water-Damage Indicators
When it comes to finding a water leak in your house, one of the first steps is to look for water damage indicators. These indicators can provide valuable clues about the presence and location of a leak. Here are some key signs to watch out for:
- Stains on Ceilings, Walls, or Floors: Water leaks can cause significant damage if not repaired promptly. Look for water stains on ceilings, walls, or floors as the first sign of a leak. These stains may appear as discolored patches or even dark spots.
- High Water Bill: Monitor utility bills for sudden increases in water usage, which could indicate a leak. If you notice a significant spike in your bill without any changes in your water usage habits, it’s worth investigating further.
- Dampness and Musty Smell: Visual dampness around the kitchen, bathroom, or laundry areas may suggest a water leak. Additionally, if you notice a musty smell that lingers in specific areas of your house, it could be an indication of hidden moisture from a leak.
- Mold and Mildew Growth: Leaking water provides an ideal environment for mold and mildew to thrive. Keep an eye out for any signs of mold or mildew growth, such as black patches or a musty odor. These can often be seen on walls, ceilings, or even furniture.
- Unusual Sounds: Sometimes, leaks can produce audible cues that help pinpoint their location. Listen for running water sounds when all faucets are turned off. Leaks behind walls or underground may create distinct dripping or hissing noises that can aid in detection.
**** Emily had been noticing some odd recurring dampness near her kitchen sink area and decided to investigate further before the problem escalated. The walls adjacent to the sink showed peculiar discoloration, with faint streaks of water stains running down. There was also a subtle musty smell in the air that she couldn’t ignore. Emily knew it was time to take action and find the source of this water leak.
Tracing the Source of the Leak
Once you’ve identified potential water damage indicators, the next step is to trace the source of the leak. This can help you pinpoint where exactly the water is coming from and narrow down your search area for repairs. Here are some methods you can use to trace the source:
- Water Meter Test: Conduct a water meter test by turning off all faucets and checking the water meter. If it continues to run, there is a leak somewhere in your house. This test can give you an initial indication of whether the leak is within your property.
- Water Pressure Test: Turn off all faucets in your home and measure the water pressure using a pressure gauge. Low pressure may indicate a leak in the plumbing system. If you notice a significant drop in pressure, it’s advisable to seek professional assistance to locate and fix the leak.
- Visual Inspection: Inspect visible pipes, fittings, and fixtures for any signs of leakage. Look for dripping taps, leaking toilet tanks, or puddles around appliances like dishwashers or washing machines. Sometimes, minor leaks can be identified by inspecting washers and cleaning debris or replacing affected pipes.
**** David had been experiencing low water pressure in his bathroom for weeks. After conducting a water pressure test, he noticed a significant drop in pressure when all faucets were turned off. Intrigued, he decided to examine his shower head closely and discovered leaks around its connections. He immediately turned off the water supply and replaced the necessary parts to fix the issue.
Water meter and Pressure Tests
When it comes to detecting water leaks in your house, two initial tests can help pinpoint the source of the issue: a water meter test and water pressure test. These tests are simple yet effective methods that can provide valuable insights into the presence of a leak.
The first test involves checking your water meter. Here’s how you can conduct a water meter test:
- Start by turning off all faucets and ensuring that no appliances are using water.
- Locate your water meter, usually found outside near the property line.
- Check if the small leak detection indicator on the meter is moving. If it is, there may be a leak in your plumbing system.
- To confirm the presence of a leak, write down or take a photo of the current reading on the meter, then wait for around 30 minutes without using any water.
- After the specified time has passed, recheck the meter reading. If it has changed, even slightly, it indicates that there’s a leakage somewhere.
The second test involves measuring your water pressure. Follow these steps:
- Turn off all faucets and ensure no water is being used.
- Attach a pressure gauge to an outdoor hose spigot or an indoor faucet.
- Open the faucet slowly and note the PSI (pounds per square inch) reading on the gauge.
- Compare the measured pressure with the recommended range for your area, typically between 40 and 80 PSI.
- Low-pressure readings could indicate a potential leak in your plumbing system.
Conducting both these tests is essential to identify if there is a water leak in your house and determine its severity. Remember to keep safety in mind at all times during these tests.
Common Leak Sites and Their Identification
Water leaks can occur in various areas of your house, each with its own telltale signs. By understanding these common leak sites and their identification methods, you can narrow down the search for a potential leak:
- Faucets and Fixtures: Check for dripping or leaking faucets, showerheads, and valves. Inspect washers and clean debris that may be causing leaks.
- Toilets: A leaking toilet can waste a significant amount of water. Place a few drops of food coloring in the tank and wait without flushing. If color appears in the bowl, there’s a leak that needs to be addressed, such as replacing the flapper or tightening bolts.
- Pipes: Look for signs of leaks along exposed pipes, such as wetness, discoloration, or mold growth. Pay attention to unusual sounds like dripping or hissing behind walls or ceilings.
- Appliances: Disconnect appliances one at a time to identify any leaks. Check under sinks and behind refrigerators or washing machines for signs of water pooling or dampness.
- Walls and Ceilings: Water stains, discoloration, musty odors, bulging, or peeling paint on walls or ceilings may indicate hidden leaks inside. Listen for dripping sounds behind walls and pay attention to any sudden increases in your water bill.
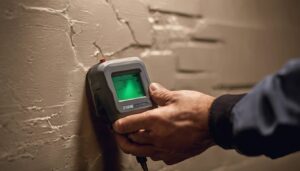
Remember that these are just some common leak sites in a house, but leaks can also occur in less common areas such as crawl spaces, basements, or underground plumbing lines. If you suspect a hidden leak but cannot pinpoint the source, it’s essential to seek professional help from a licensed plumber equipped with moisture meters or infrared cameras to accurately locate and fix the problem.
Now that we have identified common leak sites in your house, let’s move on to the next crucial step – fixing the water leak.
Steps to Fix the Water Leak
When faced with a water leak in your house, it’s important to act quickly to prevent further damage. Here are the steps you can follow to fix a water leak:
- Identify the Source: The first step is to locate the source of the leak. Look for any visible signs such as water stains on ceilings, walls, or floors. Listen for running water or dripping sounds that may indicate a hidden leak behind walls or floors.
Let’s say you notice a damp spot on your living room ceiling. Start by inspecting the area and check for any discoloration, texture change, or musty smell that might suggest a water leak behind the ceiling. This will help narrow down your search for the source of the leak.
- Turn Off Water Supply: Once you’ve identified the source of the leak, turn off the water supply to that specific area if possible. This will help prevent further water damage while you work on repairing the leak.
For instance, if you discover a leaking pipe under your kitchen sink, look for the shut-off valve beneath the sink and close it to stop any more water from flowing through the pipe.
- Gather Necessary Tools and Materials: Before you start repairing the leak, gather all the necessary tools and materials you’ll need for the job. This may include wrenches, pipe cutters, plumber’s tape, sealants, or replacement parts like washers or pipes.
If you’re dealing with a dripping faucet in your bathroom, make sure you have an adjustable wrench to remove the faucet handle and access the cartridge or washer inside. You might also need plumber’s tape and a new washer to replace any worn-out components causing the leakage.
- Repair or Replace Damaged Parts: Depending on the severity of the leak and the type of plumbing system you have, repair or replace the damaged parts accordingly.
Suppose you find a leaking joint in a pipe under your sink. Use a wrench to tighten the connections and see if that stops the leak. If it persists, you may need to apply plumber’s tape or use sealants to create a watertight seal.
Now that we’ve gone through the steps to fix a water leak in your house, let’s dive into some DIY repair tips and when it’s appropriate to call a professional for assistance.
DIY Repair Tips and When to Call a Professional
While it’s possible to tackle certain water leak issues on your own, there are situations where calling a professional plumber is the wisest course of action. Here are some DIY repair tips and guidelines on when to seek professional help:
- Minor Leaks: For minor leaks like dripping faucets or small plumbing leaks, you can typically handle the repairs yourself. Tightening connections, replacing washers or cartridges, and using plumber’s tape are often sufficient solutions.
Let’s say you have a leaking showerhead that drips even when turned off. Begin by turning off the water supply, unscrewing the showerhead with an adjustable wrench, and examining the internal components. Look for any worn-out rubber washers or damaged O-rings that need replacing.
- Moderate Leaks: When dealing with moderate leaks, such as leaking pipes or faulty toilet mechanisms, it may still be possible to attempt repairs on your own. However, careful consideration is necessary, as these leaks can potentially escalate if not addressed properly.
Consider a leaking pipe in your basement. You can try using plumber’s tape or applying epoxy putty around the leaking area as temporary fixes until you can replace the affected section of the pipe.
- Severe Leaks or Complex Issues: In cases of severe leaks, burst pipes, significant water damage, or if you are uncertain about the appropriate repairs, it’s strongly recommended to call a professional plumber. They have the expertise, experience, and necessary tools to handle complex issues safely and effectively.
Imagine discovering a water leak within a wall that has led to mold growth or extensive damage. This requires specialized equipment like moisture meters and infrared cameras to trace the source without causing further destruction to your home. A professional plumber can assess the situation accurately and carry out the necessary repairs.
Knowing when to tackle a water leak yourself and when to seek professional assistance is crucial in preventing further damage or potential hazards. By understanding these guidelines, you can make informed decisions in addressing water leaks effectively.